
I'm beginning to question my purpose in life, because nothing gets you guys going like plant talk! There's not enough interior styling posts, project updates or outfit inspo that I can give ya'll that would amount to what happens when I start talking about plants, so it was a must that I cut out major space on the blog for it!
And speaking of major space, let's get into one of the most fascinating house plants to care for...the split leaf monstera.
Common names: Monstera, Split leaf Monstera, Swiss Cheese Plant

Monsteras love medium to bright indirect light. Too much direct sunlight can scorch their leaves. Mine lives in a south facing window of our home and elevated up off the floor to for as much indirect exposure as possible.

One of the most common indicators of the plant are the holes in its broad green leaves. Hence the nickname "Swiss cheese" plant. In their native habitats of tropical jungle floors, monsteras develop the holes in their leaves to allow more sun light and rain to pass through to the rest of plant and its roots! But, not all monstera leaves will have holes. This is a characteristic that the plant develops as it matures.

Monsteras are very vine-like as they grow and tend to climb vertical surfaces around them. As the mature, lots of plant owners like to give them stake to encourage that upward growth. I haven't needed to do this yet, but things may change as it grows.

And since it grows like a vine, there are always multiple opportunities for new growth. New shoots form and grow from the end of each newest leaf. Once the new leaf grows out, the vine develops a node. In lots, but not all instances, these nodes eventually grow into aerial roots, which is what the plant uses to attach to and climb vertical surfaces.


Propagating a Monstera:
Since my monstera is pretty mature and very healthy, I have several options when it comes to selecting cuttings to propagate. I can take multiple small cuttings of just 1-2 leaves with nodes, or I can cut one full cutting that has 4-5 leaves and nodes on one vine. In this particualr instance, I went with the second option.
When preparing to take a cutting, you want to make sure you have a sharp knife or sheers and you want to make sure that it's clean to not contaminate the parent or the cuttings. Clean thoroughly with soap and water and maybe even rub with a little bit of rubbing alcohol before using.
You'll want to cut directly below a node or aerial root.

My cutting was a vine length of 6 leaves and 6 nodes/aerial roots.

And just like propagating a pothos, you'll want to cut each leaf & node into individual segments on either side of the node/aerial root.


You should be left with leaves with an attached node/aerial root like this.

The youngest leaf had a node that had not yet fully developed (you can kind of see it bumping through), but its still viable for propagating.

Once your cuttings are separated, you'll want to pull off any old sheathing from the stems of the leaves. These can rot when submerged in water for long periods of time and compromise the propagating process.


Now, your cutting are all prepared for their temporary home. All you need is a vessel (I prefer clear) and water.

Before submerging the cuttings in water, it's good to let the cuts "heal" or dry out a bit. This only takes a few minutes.

You can trim back the aerial root, but I like to keep mine in tact. I just carefully roll it up to fit comfortably at the bottom of my vessel.

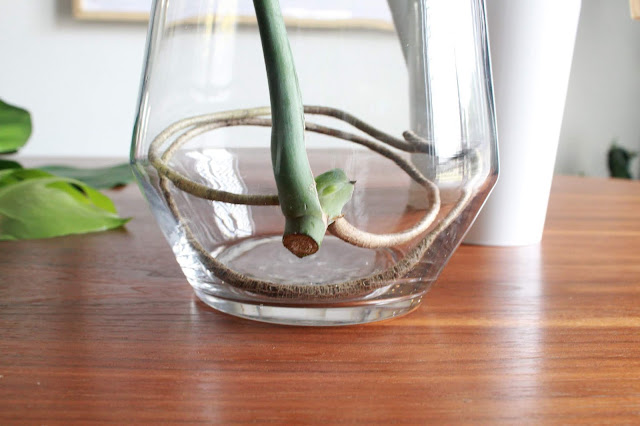
I then arrange the rest of the stems in the vessel, spacing each of them out to give them rooting room, but also arranging them stems in a way that would look good once they're planted in soil. There's not a lot of freedom to try to arrange them at that point due to their new root system.


Once they're arranged to your liking, just pour in water until the roots and ends are completely covered.

Place in a place that's bright, but not directly in the sun, and change the water every 3-5 days. You should start to see roots developing after about 2-3 weeks!

These cuttings have been in water for about 3 months now!

Not only has it developed new roots, but there's tons of new leaves growing in too!


Below is my very first attempt at propagating a monstera. I followed all of the steps above and after about 3 months, potted the cuttings in soil. I water it once a week and its been thriving ever since!

Your questions, answered:
Are monsteras good for beginners?
Yes! They're great for beginners and are very easy to care for once they're in the right light and are getting the right amount of water.
What kind of soil do you use? Do you need moss or pearls?
I use regular miracle grow indoor potting mix and pot them in a well draining pot. No moss or pearls needed.
Can you control the shape by cutting it down?
Short answer, yes. That's part of the reason behind propagating. I wouldn't cut too much or too often because you run the risk of sending the plant into shock, and killing it.
How do I know when to transfer it to a new pot?
When you can see the roots through the soil or you can tell the growth has slowed quite a bit, it's probably time for a new and bigger pot.
When do you fertilize it?
I fertilize all of my plants during the growing season (April to September). Since I water them all weekly, I will fertilize every other week. I like liquid fertilizers (plant food) so that I can control how much each plant gets.
Where can I get a monstera?
Try your local Lowe's or Home Depot or grocery stores, like Kroger may carry them in the summer months. You can always check local nurseries and online nurseries, like The Sill, as well.
Hope this answers all of your burning questions! If not, just drop them in the comments below! Happy propagating!

These are my favorites to work with.. they're easy and very forgiving. You shared excellent step by step directions..
ReplyDeleteThank you so much! They're definitely at the top of my list of favs!
DeleteLove this post friend. It’s so so informative! Thank you for sharing!!
ReplyDeleteThank you bestie!!! Enjoy your new baby!
DeleteThank you so much for these step-by-step instructions! I just brought my monstera home yesterday and she had a couple of beat up leaves that were also leaning way out in a weird direction compared to the younger leaves. Followed your instructions and put these two pieces in a jar to propagate! Super excited to see how it turns out!
ReplyDeleteHi,what happens to the portion of the parent plant that I took the cutting from? Will that continue to produce new growth or will that portion die?
ReplyDeleteWow, this is the most comprehensive and understandable post on propagating monsteras that I've ever seen! Saved to Pinterest for future reference, thank you so much!
ReplyDeleteNice Info Philodendron Plant Food
ReplyDeleteThank you so much for sharing! I love these plants ��
ReplyDeleteThank you so much for these step-by-step instructions! I just brought my monstera home 2 weeks ago please tell me when to fertilize monstera plant
ReplyDeleteThank you for sharing! Now I'm ready to propagate my Monstera. <3
ReplyDeleteDie Classic-Arnika-Creme gehört jetzt zu meiner täglichen Pflegeroutine, ich bin begeistert.
ReplyDelete